
9 Reasons Why Chives Turn Yellow (Plus How to Stop It!)
Fresh chives are definitely a great addition to many dishes and dips. I love them! However, when I planted them for the first time—years ago—I was quite disappointed to see them yellowing and dying around winter. As it turned out, that’s normal. However, yellowing chives can be triggered by lots of other reasons!
Chives leaves can turn yellow as a result of 1) aging, 2) underwatering, 3) overwatering, 4) insufficient light, 5) excessive light, 6) transplant shock, 7) nutrient deficiencies, 8) pest damage, and 9) plant diseases. Out of all these causes, abnormal yellow markings are generally only due to pests and diseases.
Yellow shoots don’t necessarily mean that your chives are dying. So you need to keep an eye out for all possible reasons for this. Besides that, you should also familiarize yourself with the main ways to solve and prevent yellowing altogether!
1. Aging
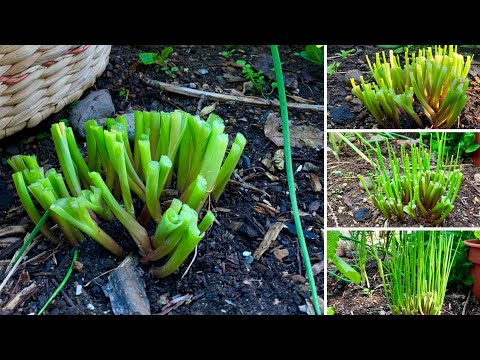
A clump of chives will naturally start developing old yellow leaves by the end of the growing season even though it is completely healthy. This is a sign of natural aging.
This is nothing surprising for experienced gardeners, but for newbie home gardeners this can truly be shocking—it definitely was for me!
Beginner plant owners expect their lovely and flavorful chives to stay green throughout the year as long as it is properly taken care of. However, that just isn’t the case at all!
On the other hand, yellowing due to age isn’t much of a problem either. It’s just a natural part of their life cycle.
Even as cool-season perennials, chives will regularly die back around November to January. They will start off turning yellow from the tips, become completely dry and brown, and finally wilt before growing new green shoots in spring.
As alarming as it may seem due to the drastic change in appearance, they’ll return to their full glory when the conditions become more ideal for their growth.
Solution
Despite the fact that there is no way to stop aging (I wish!) and avoid your chives becoming yellow you just need to harvest them before the end of the growing season—before October or November.
You’ll have fresh green leaves to cut for most of the year. It’s best to trim them off with a clean pair of scissors, leaving just about 1–2 inches (2–5 cm) to allow them to grow back again once spring comes.

By doing so, you can avoid losing your chives’ aromatic and flavorful leaves to yellowing due to age. Make sure to store them properly in freezer-safe resealable bags and you’ll still have plenty to use for the rest of the cold winter months. Only thaw what you’ll need.
If you do still end up with a couple of yellowing chives, just cut them and add them to your compost pile. You could also opt to let them dry and then use them as mulch. They won’t be a waste either way!
2. Underwatering
The leaves of underwatered chives will slowly start turning yellow from the leaf tips due to the lack of moisture in the soil. A yellowing chive plant may just be drying out.
Oftentimes, this happens for people who grow their chives in containers—especially when there are too many large drainage holes at the bottom.
As you probably know, container plants are more prone to underwatering. This is because they don’t typically have a built-in water reservoir at the bottom unlike those that are planted directly in the ground.
Looking for pots with built-in reservoirs? Read our article on terra cotta pots with side holes!
So once the roots hit the bottom of their pots and circle around the growing medium inside but still don’t find any water, they’ll inevitably turn yellow, dry up, and droop. Because chives love moist soil, they react quickly to dry soil.
But don’t worry! You can avoid having your chives die on your if you act quickly enough.
Solution
At-home gardeners can easily avoid underwatering and yellowing by giving their chives about 1 inch of water per week—regardless if they are ground directly in garden soil or pots.
Having a moisture meter like this one from Amazon can also be helpful with determining whether or not you need to give your chives more water.
No products found.
Topping off the soil with a layer of mulch during spring and summer can also help your chive stay cool and moist for longer periods. As a bonus, you’ll also prevent weed growth!
3. Overwatering
Poor drainage resulting in over-saturated soil will result in yellowing chives. Excess water in the growing medium suffocates the root system of the plant.
Similar to us humans, plants including chives can also drown when given too much water than they can handle.
They can’t breathe when they are overwatered because there is no room for oxygen to move through a saturated growing medium. As a result, they turn pale yellow and start dying.
It’s similar to how we also become almost ghostly pale when we can’t breathe properly!
For such cases, chives typically turn soft too before becoming super mushy and falling off. Its growth will likely take a hit as well, becoming stunted pretty quickly.
If left in this state, you’ll likely lose your fragrant chives to root rot!
Solution
Never water your chives if the topmost layer of its soil is still moist to the touch. Dark-colored soil is usually a tell-tale sign that it still has enough water, so you don’t have to give it more.
Remember, the top layer is usually drier. So, if the top is still moist then the lower layers (where the roots are) are even wetter.
You can also stick a wooden chopstick into it by about an inch or so to determine how dry it has become. If it comes out clean and dry, it’s time to give your chives some fresh water!
Aside from watering, you should also make sure that its pot has drainage holes if you’re growing them in containers. I would also advise you to use a light and well-draining soil mix with some perlite.
4. Insufficient Light
When exposed to only 2 hours or less of direct sunlight, chives will turn yellow due to the chlorophyll breakdown in their leaves.
Virtually no plant on earth can survive without light—even if it’s only from artificial sources. It allows plants to produce chlorophyll (the green pigment) which enables them to make food for themselves.
Light is essential in producing green pigments in plants. So when there is little to no light available, plants will lose their green color and instead end up yellow.
So although chives can live with some light shade, it still needs to be exposed to at least 2 hours of direct light exposure—be it from the sun or a grow light that’s strong enough.
Just keep in mind that your chive is likely to grow very slowly in such a short time under the light.
Without that, all the chlorophyll in its leaves will be drawn away from the leaves. This will leave behind only the carotenoids which give herbs like chives a pale yellow hue.
In such conditions, chives will also droop over. You’ll likely experience this during late fall or in winter if you’re growing your chives outdoors as daylight hours are naturally short during these periods.
Solution
When you live up north, in states like Ohio, consider bringing your chives indoors before the last frost date up until spring. You can slowly bring it outdoors again when it’s warm enough—but more on this later.
Place it 6–12 inches (15–30 cm) under a 15–25W full-spectrum grow light for about 12–14 hours. Doing this will allow you to continue harvesting fresh chives indoors during the colder and darker months of the year!
Alternatively, they will receive more sun if you place them near west or south-facing windows compared to east and north-facing ones.
Learn more in our article on north-facing gardens!
5. Excessive Light
Chives can burn from too much light exposure, especially during very hot summers, and start turning yellow at the tips. As time passes, they will turn brittle and brown.
With too much light, chlorophyll will also degrade and the leaves of your chives will inevitably start losing their lush green color.
If you leave your chives directly out in the sun for more than 8 hours at a time in the heat of summer—without any protection whatsoever—you’re likely to get sunburnt leaves.
Extreme light and heat will cause the chlorophyll in chives to break down and become pale yellow—bleached, to put it more simply.
Over time, if none of these conditions are corrected, your chives will dry up and become brown. It will be so dry that you can easily crush it into pieces just by rubbing your fingers lightly on its brittle leaves.
You can expect the same thing to happen if you grow them too closely to artificial light sources.

Although this will likely happen more slowly with LED grow lights than fluorescent ones, both will have the same effect if placed closer than 6 inches (15 cm) from the tops of your chives!
Solution
Move your outdoor potted chives to a shady location and only give them 4–6 hours of harsh sun exposure during really hot summer days. But for the rest of the year, they will thrive with more or less 6–8 hours of full sun.
If you are growing them indoors using grow lights, remember to regularly adjust the height of your lights as your chives grow. Never let it touch the bulb directly.
6. Transplant Shock
Drastic changes in growing conditions after transplanting can shock chives and cause them to become yellow. It can die if not properly hardened off beforehand.
In a perfect world, we’d be able to transplant our plants—chives included—regardless of the time of year. Sadly, this isn’t possible in the real world.
Without being given the chance to gradually get used to drastic changes in its growing environment, your chives can quickly fail and die. One common sign of this is yellowing leaves.
You need to allow your chives to slowly get used to changes in light, temperature, and moisture, for them to survive and thrive after being transplanted or repotted.
Otherwise, it will turn yellow and wither due to all the stress. This will cause it to lose not only its appetizing green color but also its amazing flavor and aroma, rendering it useless for your recipes!
Solution
For chives to take well to their new environment, they need to be hardened off for a few days—or weeks—before they are finally moved to their new location.
For those of you that are not that into gardening yet, hardening off plants is the process of gradually letting those started indoors to adjust to outdoor growing conditions.
Their soil must be kept moist throughout the process while they are slowly adjusting to the change in light conditions and ambient temperature. You can help them avoid experiencing transplant shock by doing this.
Personally, I think that it’s best to have your chives adjust to outdoor environments by hardening them off during days when the temperature and light are considered mild. A cool and overcast morning would be great for this!
7. Nutrient Deficiency
If chives don’t receive sufficient amounts of macro and micronutrients—such as nitrogen and iron, respectively—they will undergo chlorosis and turn yellow.
Like us humans, chives need lots of nutrients to grow well too. When deprived of such essential nutrients, they can start turning yellow before finally withering away.
Oftentimes, this happens whenever home gardeners grow their chives in single small containers for several years without regularly feeding them and dividing the clumps. In effect, the soil becomes sterile over time.
More specifically, a significant lack of either nitrogen or iron can quickly contribute to chlorosis in chives. The pattern of yellowing will vary depending on the exact nutrient that’s greatly lacking in the soil.
Discover the different signs in our article on how soil pH affects plant growth!
But several factors can hinder plants from properly absorbing nutrients from their growing medium, even when it’s fertile. For instance, it’s harder for your chives to take in any nutrients when their roots are damaged by pests and diseases.
Affected yellow leaves are more prone to burning and catching diseases as well. In severe cases—which are uncommon but not unheard of—the entire clump of chives could die.
Hence, it’s best to make sure that your chives are getting enough nutrients and can absorb them well to prevent yellowing due to deficiencies. Find out how to do this in the next section!
Solution
In reality, chives aren’t that demanding when it comes to nutrients. So a regular light application of a balanced fertilizer will be great in helping them stay green and lush.

Apply a diluted liquid fertilizer at half strength every 1–1.5 months, from spring to fall.
Be very careful not to over-fertilize it. Otherwise, chives will lose a lot of their flavor.
Besides that, it’s always a good idea to get your soil tested if you’re planning to grow your chives outdoors.
8. Pest Damage
Irregular yellow markings on chives are a typical sign of pest infestations. These discolored leaves generally wilt and die once they are greatly damaged.
Even though they are largely considered highly resistant to pests such as thrips and aphids, they can still get attacked by pesky bugs.
They commonly leave behind uneven yellow patches of damaged plant tissue on chives after they feed on such plants, sucking out their sap. Infested will have stunted growth too, steadily losing vigor until they’re wilted.
Such marks typically don’t follow a consistent pattern. Instead, they simply appear on any part of the plant that has been attacked by the unwanted guest.
Other common pests that target chives include various nematodes, onion maggots, and spider mites.
Unfortunately, there aren’t always readily noticeable so you might only see the damage once it’s become pretty extensive, as is commonly the case for nematodes that normally live underground.
Solution
In such events, there isn’t any need to remove yellowed leaves as long as you can effectively get rid of the pesky bugs feeding off your chives. Nevertheless, cutting off the damaged leave will make your plants look neater.
You can kill off pests without harming your chives by using insecticidal soaps just like this one from Amazon. Just shake, aim, and spray!
No products found.
Alternatively, you could make your very own neem oil spray. Regular morning applications will help you eliminate existing pests and prevent future infestations.
9. Plant Diseases
Various diseases, mainly fungal types, can cause chives to turn yellow. Discoloration may begin as tiny spots, eventually, these can spread throughout the infected leaves.
When grown in ideal conditions, there’s very little chance that your chives will get sick and die. However, it can still happen due to an unfortunate event or a single careless mistake.
For example, unexpected heavy afternoon rain could leave your chives wet until night, making them more vulnerable to fungal spores. You might also be unwittingly spreading harmful viruses and bacteria by using dirty tools.
Below are diseases that can result in yellow chives:
- Botrytis neck rot
- Downy mildew
- Fusarium basal rot
- Iris yellow spotted virus
- Onion rust
- Verticillium wilt
When the infection has progressed it will turn yellow in the same way it would when old. However, don’t be fooled! Closely inspect those clumps to rule out the possibility of disease.
Peel off yellowing leaves to check for other indications of disease deep within each clump. Carefully look for abnormalities on the leaf surface as well.
Other common signs of infection in chives may include fuzzy patches, collapsed leaf tips, small pustules, brown streaks, soft mushy necks, and rotting bulbs.
Solution
Pull out infected clumps completely and discard them to avoid further spreading. Rotate it with non-allium crops for 3–4 years at a time and space each clump out by at least 6 inches (15 cm) to avoid overcrowding.
Always monitor weather forecasts in your area if you have your chives growing outside, in your yard. This will help you prepare for sudden changes in weather which could be detrimental to your plants.
Make sure to also clean your garden tools before and after using them to limit the spread of diseases in the garden—be it indoors or outdoors. Then, remember to harvest them on dry but cool days to avoid infection after cutting.
FAQs
Can you make yellow chives green again?
One cannot make yellowed chive shoots green again after the discoloration. When it turns yellow, the leaves lose all their chlorophyll—the pigment responsible for giving plants their distinctive green color. Alongside this, all other nutrients are taken from the yellow chives and redirected elsewhere. This process cannot be reversed.
Are regular chives the same as garlic chives?
Regular chives (Allium schoenoprasum) are different from garlic chives (Allium tuberosum). The former has a more subtle onion flavor while the latter tastes more like mild garlic. Chives have tubular leaves while garlic chives have flat leaves. Their flowers are also different, chives grow pale purple blooms and garlic chives grow cream ones.
Summary of Why Chives Turn Yellow
Chives will naturally start turning yellow starting from the oldest outer leaves at the end of every season, from late fall to winter. However, given good growing conditions, they will thrive once again in spring.
Underwatering, overwatering, insufficient light, excessive light, transplant shock, and nutrient deficiencies can all cause yellowing leaves in chives as well. This generally starts from the tips before affecting the whole leaf and wilting.
The pattern of yellowing in chives due to pest damage and plant diseases is much more obvious, often beginning as little yellow scars or spots on the leaves. When the problem has become serious, however, the whole leaf or clump can end up getting discolored and dead.
Sources
- “Growing chives in home gardens” by Jill MacKenzie and Shirley Mah Kooyman in University of Minnesota Extension
- “Excess Light on Indoor Plants” by n/a in University of Maryland Extension
- “Yellow Leaves Can Indicate Plant Problems” by Sandra Mason in Illinois Extension
- “Verticillium Wilt of Vegetables” by Ken Frost and Brian Hudelson in University of Wisconsin-Madison Extension
- “Disease Control” by n/a in University of Illinois Extension


