
Only 2 Ways to Propagate Elephant Ear Plants (Full Guide!)
Seeing as they aren’t native to the US or UK, we might not be familiar with the best way to propagate elephant ear plants for their big, beautiful, heart-shaped leaves. But I’ve got your back! I’ll tell you all there is to know about the easiest way to propagate elephant ears!
Elephant ear plants can only be propagated through 1) dividing corms and 2) sowing seeds. Some propagate elephant ears with rhizome cuttings. However, it’s important to note that Colocasia esculenta can’t survive with only their stems or leaves alone.
Despite having been naturalized in wetlands across the Gulf Coast, you’ll rarely hear about starting elephant ears from seed. Ever wondered why that’s the case? Read on to find out the answer!
1. Dividing Elephant Ear Corms in 5 Simple Steps
Ideally, elephant ear corms should be divided around spring for propagation. Colocasia division is done by 1) taking it out of the soil, 2) separating cormels, 3) cutting up big corms, 4) burying them in the soil, and 5) keeping them moist.
For some, it seems like a very troublesome job. However, I honestly think that dividing Colocasia plants and plantlets is by far the easiest way to propagate them!
Propagating taro, also known as elephant ear plant, at home is super easy! You don’t need special tools or equipment to do this successfully.
To divide elephant ear plants, these tools and materials are needed:
- Working gloves
- Tarp or newspapers
- Garden shovel
- Pruning saw or sharp knife
- Water spray bottle
- Nutrient-rich growing medium
- Small plastic pots or cell tray
- Propagation tray with small holes
The best time to propagate the elephant ear plant is in spring. By propagating these tropical beauties during warmer months—starting from March or April—when they actively grow, they’re bound to become prolific before the season ends.
Fall division is also possible. However, propagating elephant ears during the cool season will make them less winter-hardy.
So unless you live in a more tropical area like Hawaii or Florida, I wouldn’t recommend this.
1. Take It Out of the Soil
If you’ve been growing your colocasia as a houseplant indoors, carefully take the plant out of its soil and pot.
Pro Tip: Minimize the mess and make the clean-up afterward much easier, lay out a tarp or some newspapers wherever it is you’re planning to do all of this.
Loosen up the soil by the sides of the pot to make it easier to take everything out. Be extra mindful if your potted elephant ear has already grown overcrowded. Don’t crush the leaves.
Use a garden shovel if you have your elephant ears planted directly in the soil. You want to dig up the plant as whole as possible. But it’s okay to break them up—more on this later.
Once you’re all done, remove as much of the soil sticking to the roots and corms as much as possible.
2. Separate Cormels
Untangle the roots growing around the corm of your elephant ear. Doing so will minimize possible damage while you break it all apart during division.
Don’t be afraid to use your fingers to untangle them. It’s absolutely fine to break a few—these plants are strong!
Pro Tip: Wear thick working gloves before separating elephant ear cormels to prevent skin irritation.
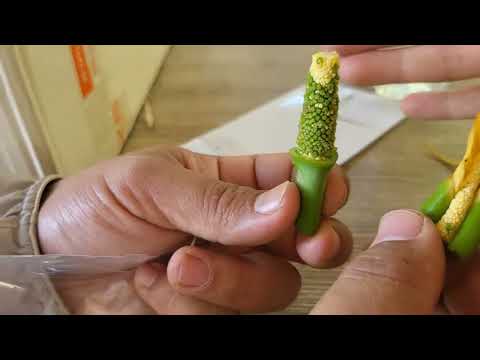
Gently pull apart the pups or cormels with roots that are growing from the main corm—which most people refer to as bulbs. Technically, they are tubers, a starchy modified stem base.
Taro cormels snap off pretty easily without much force. You can also try slowly teasing them apart for a cleaner break.
3. Cut Up Big Corms
After you’re done separating all the cormels from the main or mother corm, it’s time to cut it up into smaller pieces, especially when you already have multiple plantlets sprouting on it.

You see, 40–60 buds can grow from a single mature taro corm. In other words, cutting mature corms will help you multiply your big-leafed elephant ear plants much faster!
Pro Tip: Thoroughly disinfect your pruning saw or kitchen knife to prevent possible contamination and infection which can result in propagation failure for your colocasia.
Discover the different effective ways to disinfect garden tools!
Slice the mature elephant ear corms horizontally into 1–2-inch (2.5–5 cm) thick pieces. Each bud needs to have at least 1 cubic cm of corm for them to develop.
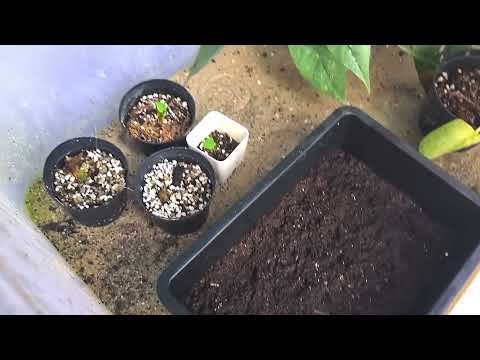
4. Plant Them Individually
Individually pot your smaller elephant ear plantlets in small 1-gallon plastic containers, such as nursery pots, to better manage them all.
You can also use cell trays if you have multiple tiny cormels with baby colocasia plants already growing on them.
To increase the chances of your cut-up corms surviving, use a soilless potting mix that’s rich in nutrients, retains moisture well, but also drains excess water readily.
Pro Tip: Peat moss and coco coir potting mixes are a great option for propagating elephant ear plants.
5. Keep Them Moist
Water-propagated elephant ear plants regularly to keep their soil moist. Most varieties can generally withstand—prefer, even—boggy conditions.
Check out other plants that are perfect for ponds!
Replicate such growing conditions by placing their pots in a shallow tray like the one below from Amazon that’s filled with clean water.
No products found.
Pro Tip: Prevent bacterial and fungal buildup by having a hose or tap continuously provide running water to the tray. Just keep the flow low and steady to avoid wasting water.
Place them by a sunny southern window or supplement their lighting needs with a grow light.
Keep colocasias indoors until nighttime temperatures steadily stay above 50°F (10°C) and daytime temperatures reach at least 70°F (21°C). Only transplant or move your elephant ear plants outdoors once it has warmed up and the danger of the last spring frost has passed.
2. Sowing Elephant Ear Seeds in 4 Easy Steps
Elephant ears can also be propagated through seeds by 1) preparing the starting mix, 2) spreading out seeds, and 3) keeping them warm and humid. Start 3-month-old elephant ear seeds indoors, early in spring.
Despite being a rare practice in the northwest, it is possible to multiply your colocasia by starting them from seed. However, it will take them a much longer time to get established.
To plant elephant ears from seed, these tools and materials are needed:
- Small shallow plastic pot or cell tray
- Propagation tray with small holes
- Nutrient-rich growing medium
- Water spray bottle
- Seedling heat mat
- Full-spectrum grow light
- Humidity dome or cling wrap
Having said all of that, it’s important to keep in mind that the viability of elephant ear seeds quickly declines within just a few months.
Colocasia seeds that are 3 months old or younger typically have germination rates of 75–80%. After a total of just 12 months, they may only be viable by 40–50%.
Furthermore, elephant ear plants rarely flower in the States due to the cold weather. In short, they generally fail to bloom, fruit, and go to seed, which is why they’re more often propagated through corm division.
But in tropical areas, colocasias are typically grown from seed for breeding projects. Some research also shows that such seedlings have improved properties, like blight resistance.
1. Prepare Starting Mix
It’s best to select a sterile seed starting mix to minimize the risk of losing any of them to pathogens that may be brought on by regular potting mix.
You could use materials such as vermiculite. You could also add some perlite and sand to weigh the elephant ear seeds down in the soil while keeping it moist but not sopping wet.
I’ve also seen people use sphagnum moss, peat moss, and some compost with mixed results. So go ahead and try it out if you want to as well.
Put all of these in a shallow plastic container or a seedling tray pat it down a bit and even it out. Then, water it thoroughly until the excess drains from the holes at the bottom.
2. Spread Out Seeds
When the starting mix and container are ready, evenly spread out the seeds straight from the packet on top of the growing medium.
Because of their small size, elephant ear seeds are best sown while the medium is still moist. Otherwise, they can easily be blown away by the wind.
I’ve seen other people also apply booster hormones but be very careful with applying any of those as they can be quite potent.
3. Keep Warm and Humid
Unless you’re living in southern states, it can be very difficult to provide a warm and humid growing environment for your elephant ear seedlings even in spring.
As such, it’s best to start them indoors, placed on top of a seedling heat mat so that they can stay warm at 77–82°F (25–28°C). Keep them humid up by about 65% with a regular spritzing of water. A humidity dome like this one from Amazon will be useful too.
No products found.
Pro Tip: You could keep colocasia seedlings in a plastic storage bin or just place some cling film on top until they sprout.

With ideal conditions, elephant ear seeds can germinate within just 5–7 days. But to make the most out of the seeds you bought, wait until 21 days have passed before tossing out any that have not germinated.
Give them a few weeks to grow and develop relatively big leaves before finally transplanting your elephant ear seedlings outdoors or to a bigger container by late spring or early summer.
Until then, provide them with 6–8 hours of full or partial sun by a south or southwest-facing window or a 20–25W full-spectrum grow light placed at least 6 inches above it.
FAQs
Is it possible to propagate elephant ears from leaf cuttings?
It is not possible to propagate elephant ears from leaf cuttings or stem cuttings alone. Unless the “cutting” has a portion of corm or cormel on it, it will not survive. Gardeners may hear about propagating elephant ears from cuttings but these are more accurately just corm divisions with young plants already sprouting out of them.
Should you cut off elephant ear leaves?
Elephant ear leaves can be cut to the base, leaving about 1–2 inches (2.5–5 cm) of the petiole on top of the corm. Use clean and sharp pruning shears or scissors to cut the leaves. This is typically done before storing the corms during cold fall and winter months before they are once again planted in the soil during spring.
Can you propagate elephant ears in water?
Offshoots from mature elephant ear plants can be propagated in water but should not be fully immersed to avoid corm rot. This is because fully submerging the corm in water will inhibit proper gas exchange and suffocate it, resulting in failure to propagate and death. Only established elephant ear plants should have their corms planted in watery soil.
What is the best soil to use for new elephant ear plants?
The best soil to use for new elephant ear plants, as well as old established clusters, is rich loamy soil. Often, this is naturally found around wetlands, ponds, and similar bodies of water. Because of this, elephant ears if often planted at the border of water gardens.
Summary of Ways to Propagate Elephant Ear Plants
Once spring starts, start dividing elephant ear corms indoors. First, take the live plant out of the soil, separate all the cormels from the main corm, cut up the main corm horizontally, bury them in moist but well-draining soil, and keep their soil moist with regular watering until they are ready for transplanting.
Alternatively, elephant ears can be propagated from seed for breeding projects and overall plant improvement. It is important to sow these tiny seeds on a wet growing medium so they can better adhere. Elephant ear seeds can be kept warm and humid with heat mats, grow lights, and humidity domes so that they can sprout between 5 to 21 days.
Sources
- “Elephant Ears (Colocasia, Alocasia, and Xanthosoma)” by Susan Mahr in the University of Wisconsin – Madison
- “Colocasia esculenta (L.) Schott” by n/a in Univeristy of Florida, Institute of Food and Agricultural Sciences
- “Propagating Taro by the Normally Dormant Buds Present on Huli and Corm” by K. Kikuta, and G.K. Parris in the University of Hawaiʻi at Mānoa
- “The growth performance of taro (Colocasia esculenta) grown from true seed” by M. Johnston and P.A. Gendua in the University of the West Indies
- “Seed germination and seedling development in Taro (Colocasia esculenta)” by A.P. Tyagi, M. Taylor, and P.C. Deo in ResearchGate

![Christmas Tree Needles Dropping? Why and What to Do [11 Tips]](data:image/svg+xml;base64,PHN2ZyB4bWxucz0iaHR0cDovL3d3dy53My5vcmcvMjAwMC9zdmciIHZpZXdCb3g9IjAgMCA4MDAgNjAwIiB3aWR0aD0iODAwIiBoZWlnaHQ9IjYwMCIgZGF0YS11PSJodHRwcyUzQSUyRiUyRnd3dy55b3VyaW5kb29yaGVyYnMuY29tJTJGd3AtY29udGVudCUyRnVwbG9hZHMlMkYyMDIxJTJGMTElMkZDaHJpc3RtYXMtVHJlZS1OZWVkbGVzLVNtYWxsLUNvdmVyLnBuZyIgZGF0YS13PSI4MDAiIGRhdGEtaD0iNjAwIiBkYXRhLWJpcD0iIj48L3N2Zz4=)


![Bugs on Christmas Trees? [Which Ones and How To Remove Them]](data:image/svg+xml;base64,PHN2ZyB4bWxucz0iaHR0cDovL3d3dy53My5vcmcvMjAwMC9zdmciIHZpZXdCb3g9IjAgMCAxMjAwIDk2MCIgd2lkdGg9IjEyMDAiIGhlaWdodD0iOTYwIiBkYXRhLXU9Imh0dHBzJTNBJTJGJTJGd3d3LnlvdXJpbmRvb3JoZXJicy5jb20lMkZ3cC1jb250ZW50JTJGdXBsb2FkcyUyRjIwMjElMkYxMSUyRkcxNDgtUmV2aXNpb24uanBnIiBkYXRhLXc9IjEyMDAiIGRhdGEtaD0iOTYwIiBkYXRhLWJpcD0iIj48L3N2Zz4=)
